UDN
Search public documentation:
PostProcessEffectReference
日本語訳
中国翻译
한국어
Interested in the Unreal Engine?
Visit the Unreal Technology site.
Looking for jobs and company info?
Check out the Epic games site.
Questions about support via UDN?
Contact the UDN Staff
中国翻译
한국어
Interested in the Unreal Engine?
Visit the Unreal Technology site.
Looking for jobs and company info?
Check out the Epic games site.
Questions about support via UDN?
Contact the UDN Staff
UE3 Home > Post Process Effects > Post Process Effect Reference
UE3 Home > Cinematic Artist > Post Process Effect Reference
UE3 Home > Cinematic Artist > Post Process Effect Reference
Post Process Effect Reference
Overview
Common Settings (PostProcessEffect)
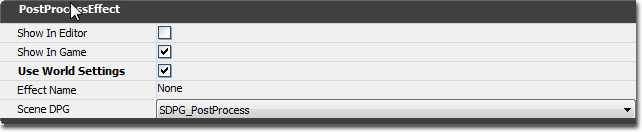 Post Process Effect
- Show In Editor - The 'bShowInEditor' property is common to all nodes, and allows toggling of the display in the editor viewports as well as being shown in game. This is sometimes useful for realtime visualization, but can get in the way of workflow if left on, such as with motion blur or depth of field.
- Show In Game - Controls whether the effect is applied in game. This is often useful when there are a bunch of effects in the post process chain that need to be enabled only during certain actions.
- Use World Settings - If this is not checked then the post process setting will come from the default values of the effect in the post process chain. If this is checked then the post process settings from the current level's WorldInfo or the current post process volume encompassing the player will override this effect. You can access the WorldInfo post process settings through View->World Properties->WorldInfo->DefaultPostProcessSettings.
- Effect Name - The name for the effect.
- Scene DPG - The (DPG) Depth Priority Group that the effect resides in. This should be set to SDPG_PostProcess for all the default Post Process effects. However, it may sometimes be useful to change this for some user created material effects.
AmbientOcclusionEffect
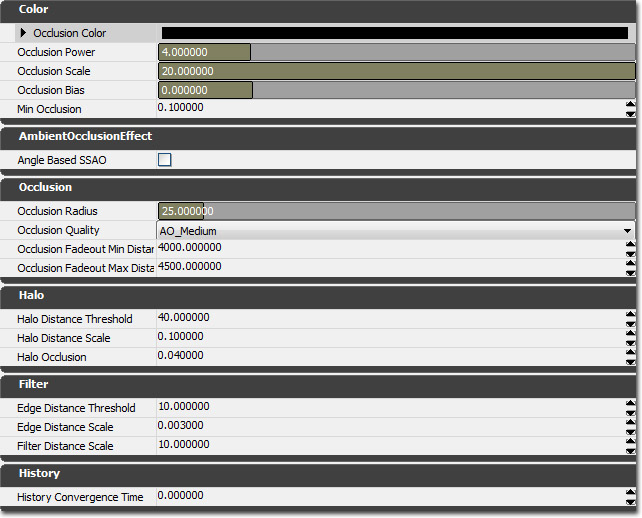 Color
After the occlusion factor is calculated it is in the 0-1 range. Some brightness and contrast controls are necessary to only get dark where you want it and not have the effect darken the whole scene.
Color
After the occlusion factor is calculated it is in the 0-1 range. Some brightness and contrast controls are necessary to only get dark where you want it and not have the effect darken the whole scene.
- Occlusion Color - The color that will replace scene color where there is a lot of occlusion.
- Occlusion Power - Power to apply to the calculated occlusion value. Higher powers result in more contrast.
- Occlusion Scale - Scale to apply to the calculated occlusion value. Unfortunately OcclusionPower and OcclusionScale are coupled together and when you change one of them you will need to tweak the other to get the occlusion back into a reasonable range.
- Occlusion Bias - Bias to apply to the calculated occlusion value.
- Min Occlusion - Minimum occlusion value after all other transforms have been applied. This is useful to keep dark areas from getting 'too dark'.
- Angle Based SSAO - If true, angle-based ambient occlusion will be used resulting in quality improvements, less noise, more detail, no darkening of flat surfaces, and no overbright on convex. Enabling this setting may require retweaking of other settings.
- Occlusion Radius - Distance to check around each pixel for occluders, in world units. This setting affects performance. Lower settings are faster.
- Occlusion Quality - Quality of the ambient occlusion effect. This setting affects performance. Low quality gives the best performance and is appropriate for gameplay. Medium quality smooths noise between frames at a slightly higher performance cost. High quality does not downsample and so has much higher frequency noise.
- Occlusion Fadeout Min Distance - Distance at which to start fading out the occlusion factor, in world units. This is useful for hiding distant artifacts on skyboxes.
- Occlusion Fadeout Max Distance - Distance at which the occlusion factor should be fully faded, in world units.
- Halo Distance Threshold - Distance in front of a pixel that an occluder must be to be considered a different object, in world units. This threshold is used to identify halo regions around nearby objects, for example a first person weapon.
- Halo Distance Scale - Scale factor to increase HaloDistanceThreshold for distant pixels. A value of .1 would result in HaloDistanceThreshold being 1 unit larger at a distance of 10 world units.
- Halo Occlusion - Occlusion factor to assign to samples determined to be contributing to a halo. 0 would result in full occlusion for that sample, increasing values map to quadratically decreasing occlusion values.
- Edge Distance Threshold - Difference in depth that two pixels must be to be considered an edge, and therefore not blurred across, in world units.
- Edge Distance Scale - Scale factor to increase EdgeDistanceThreshold for distant pixels. A value of .001 would result in EdgeDistanceThreshold being 1 unit larger at a distance of 1000 world units.
- Filter Distance Scale - Distance in world units which should map to the kernel size in screen space. This is useful to reduce filter kernel size for distant pixels and keep detail, at the cost of leaving more noise in the result.
- History Convergence Time - Time in which the occlusion history should approximately converge. Longer times (.5s) allow more smoothing between frames and less noise but history streaking is more noticeable.
Versions
This effect was first introduced in the Dec 2007 QA Build. Additional settings were added in the Feb 2008 QA Build.Visualization Modes
When tweaking these settings, it is helpful to use the following visualization modes. Some of the settings have very subtle effects and you will need to be viewing the occlusion term by itself to see what they do. There are two show flags to adjust how ambient occlusion is affecting the scene:- Editor "Viewport options/Show/Post Process Flags/Screen Space Ambient Occlusion" (can be toggled in game with the console command "show SSAO", former "ToggleAO" console command)
- Editor "Viewport options/Show/Post Process Flags/Visualize Screen Space Ambient Occlusion" (can be toggled in game with the console command "show VisualizeSSAO", former "ToggleScene" console command)
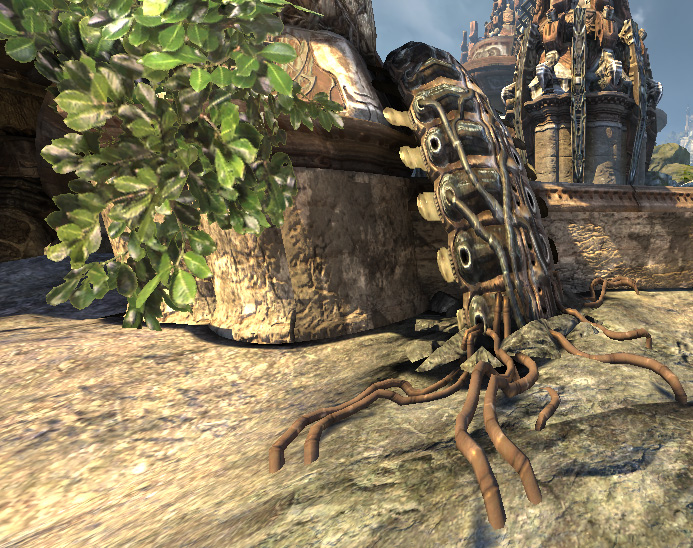 The same scene with ambient occlusion:
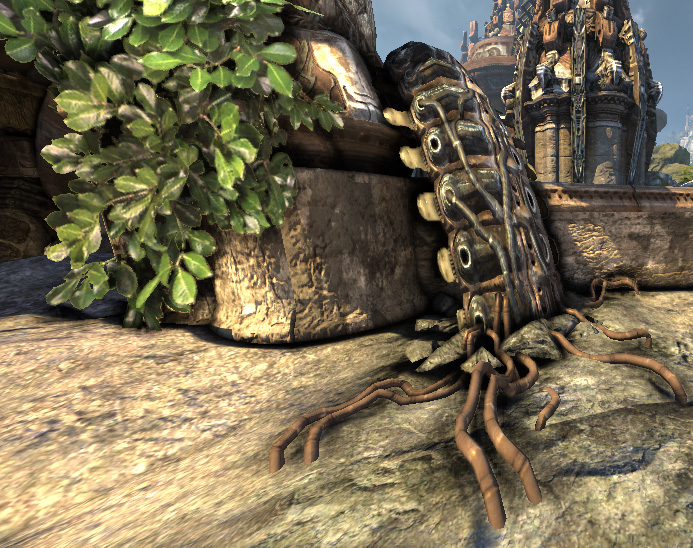 The same scene using the ambient occlusion visualization mode. Using this mode makes it much easier to see what is going on. Note that you will want to disable whatever bloom effects you have enabled or it will wash out the visualization.
BlurEffect
 BlurEffect applies a gaussian blur to the full resolution scene color. It is not optimized for consoles, but is useful for softening high resolution pre-rendered cinematics.
Blur Effect
BlurEffect applies a gaussian blur to the full resolution scene color. It is not optimized for consoles, but is useful for softening high resolution pre-rendered cinematics.
Blur Effect
- BlurKernelSize - The blur kernel radius, in pixels, to blur scene color. The smallest blur supported is 1, which means one pixel on each side of the current pixel will be weighted in during the blur. The largest is 15.
Versions
This effect was first introduced in the July 2009 QA build.UberPostProcessEffect
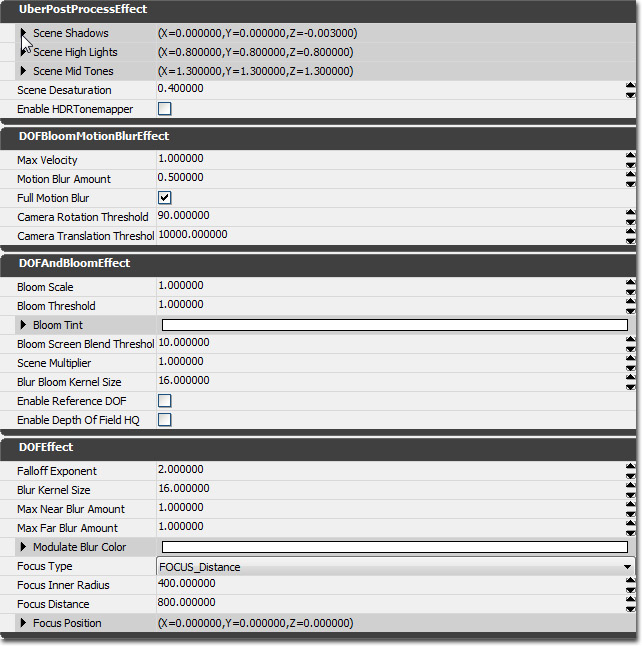 The UberPostProcessEffect can perform: depth of field, color grading, tone mapping, motion blur, bloom and image grain.
These are packaged into one node to be more efficient to render.
These parameters are used to tone map the scene, using the following equations:
The UberPostProcessEffect can perform: depth of field, color grading, tone mapping, motion blur, bloom and image grain.
These are packaged into one node to be more efficient to render.
These parameters are used to tone map the scene, using the following equations:
Color0 = ((InputColor - SceneShadows) / SceneHighLights) ^ SceneMidTones
Color1 = Luminance(Color0)

OutputColor = Color0 * (1 - SceneDesaturation) + Color1 * SceneDesaturation
Scene Color
- SceneShadows - This property allows you to control the color that is mapped to black. Any color in the scene with R, G, or B values lower than those specified in this property will be transposed to 0, or black.
- SceneHighlights - This property allows you control of all colors that are mapped to white. Any color with R, G, and B values greater than those specified in this property will be transposed to 1, or white.
- SceneMidTones - This property controls the gamma curve, which essentially determines how much contrast exists in the scene once the mapping for SceneShadows and SceneHighlights has taken place.
- SceneDesaturation - Specifies how much of the scene color to desaturate. A value of 1.0 specifies full desaturation and the scene will be displayed in grayscale.
- ToneMapper Type - This defines how the rendered HDR color is transformed into the LDR color that is shown on the screen. "Off" is the fastes option but bright colors will be clamped and might result in unpleasing burned out colors. The "Filmic" method fixes that as a reasonable performance cost. It also adds contrast which is desired for a filmic look. The "Custom" method cost a bit more performance but allows to tweak the contrast enhancing part the property "Toe Factor". The name is referring to the bottom part of the HDR to LDR function.
- Max Velocity - Maximum velocity amount, which effectively clamps the amount of blur.
- Motion Blur Amount - Scales the applied blur.
- Full Motion Blur - If true, everything (static/dynamic objects) should blur. Otherwise, only moving objects will blur.
- Camera Rotation Threshold - Minimum angle, in degrees, that the camera must rotate in a single frame before motion blur is disabled.
- Camera Translation Threshold - Minimum distance, in world units, that the camera must translate in a single frame before motion blur is disabled.
- Bloom Scale - Scale applied to bloom color.
- Bloom Threshold - Sets the minimum value any component (R,G,B) of the pixel's color must have to contribute to the bloom in the post process.
- Bloom Tint - Color multiplied against the bloom color.
- Bloom Screen Blend Threshold - Sets the maximum Scene color luminance value the current pixel can have and still contribute to the bloom. This behaves like Photoshop's screen blend mode and prevents over-saturation from adding bloom to already bright areas.
- Scene Multiplier - A multiplier applied to all reads of scene color.
- Blur Bloom Kernel Size - Radius of the bloom effect.
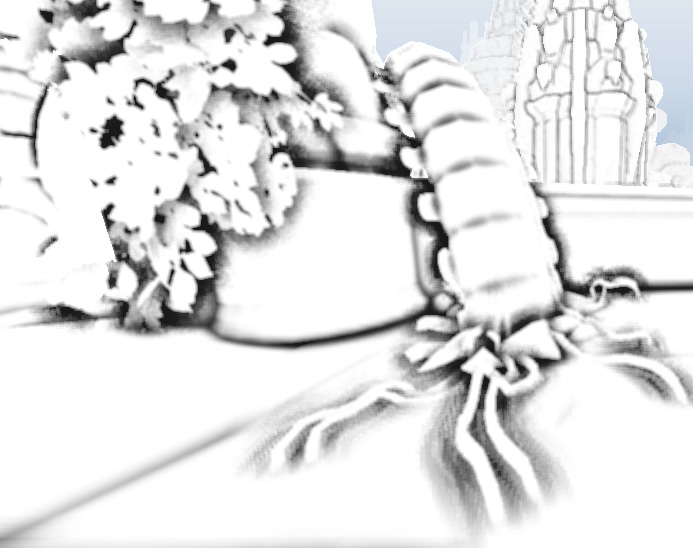
- Depth Of Field Type - You can choose between "SimpleDOF" (fast, uses Gaussian blur in quarter resolution), "ReferenceDOF" which is a high quality but potentially slow method (Disk shaped Bokeh, do not use for real-time games), "BokehDOF" which is high quality and allows to specify a custom Bokeh texture (D3D11 only)
- Depth of Field Type
- SimpleDOF fast, based on gaussian blurring of out of focus areas, quarter resolution, optimized for consoles
- ReferenceDOF high quality (full resolution), performance dependeds on Kernel radius, not optimized for shipping games
- BokehDOF high quality, supports custom Bokeh texture, more details here (DirectX 11 only)
- Bokeh Texture
- Depth of Field Quality
- Falloff Exponent - Affects how quickly the blur amount will falloff. An exponent of 1 will cause the falloff to be linear.
- Blur Kernel Size - Size, in pixels, of the kernel that should be used to blur.
- Max Near Blur Amount - Upper limit for how much blur should be applied to objects in front of the focus plane.
- Max Far Blur Amount - Upper limit for how much blur should be applied to objects behind the focus plane.
- Modulate Blur Color - A color that is modulated with the blur color
- Focus Type - Determines how the focus point is calculated.
- FOCUS_Distance - use distance from the current view. The focus point moves with the current view.
- FOCUS_Position - use a world space position. The focus point is a fixed point in the world.
- FOCUS_Distance - use distance from the current view. The focus point moves with the current view.
- Focus Inner Radius - Radius of the focus. The center point of the focus radius is always in focus and the focus amount falls off to full blurryness at the edge of the focus radius depending on the FalloffExponent specified.
- Focus Distance - Distance to the focus, used when FOCUS_Distance is specified.
- Focus Position - World position of the focus, used when FOCUS_Position is specified.
Material Effect
 Material Effect
- Material - The material effect takes a material as a parameter, which is rendered over the screen. Typically this material will include a 'SceneTexture' node. This samples the current scene, and can be combined with other material expressions to form complex effects. There is also a 'SceneDepth' expression, which samples the z buffer, for depth based effects. See PostProcessMaterials for more info.
