UDN
Search public documentation:
VertexBlendingTutorial
日本語訳
中国翻译
한국어
Interested in the Unreal Engine?
Visit the Unreal Technology site.
Looking for jobs and company info?
Check out the Epic games site.
Questions about support via UDN?
Contact the UDN Staff
中国翻译
한국어
Interested in the Unreal Engine?
Visit the Unreal Technology site.
Looking for jobs and company info?
Check out the Epic games site.
Questions about support via UDN?
Contact the UDN Staff
Vertex Blending Tutorial
Document Summary: A tutorial showing how to use Vertex Blending on StaticMeshes and importing it into Unreal Ed. Document Changelog: Last updated by Jason Lentz (DemiurgeStudios?), to include extra material browser steps and an additional example download. Original author was Jesse Taylor (Structure Studios).What is Vertex Blending?
In a nutshell, vertex blending can be used to blend one material on your mesh into another, or into nothing, along predefined vertices using a method called vertex painting. The benefits of this are quite extensive due to its simplicity and flexibility. You're able to create much more realistic, natural-looking models without the need for complicated skinmeshes. Additionally, you can reuse the same materials for other models, or simply swap out materials on your mesh.The Process
Everything starts with your model preparation. For this tutorial, 3D Studio Max will be referenced for the process of exporting a static mesh, though not in great detail. Additionally, this tutorial will cover three basic methods of vertex blending.- Blending from one material to another using the same UV mapping.
- Blending from one material to nothing.
- Blending from one to another using two different UV mapping coordinates (two UV channels).
Blending Materials with the Same UV Mapping
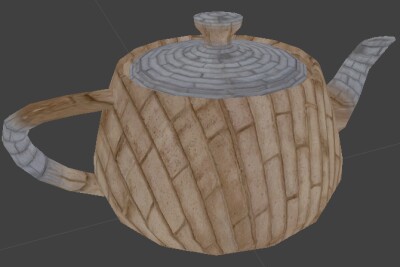
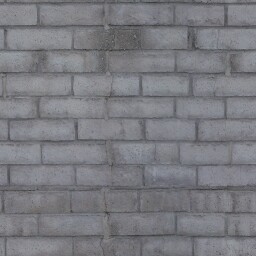
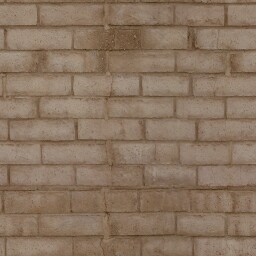
This option allows you to blend from one material to another, using the same UV coordinates, as seen below.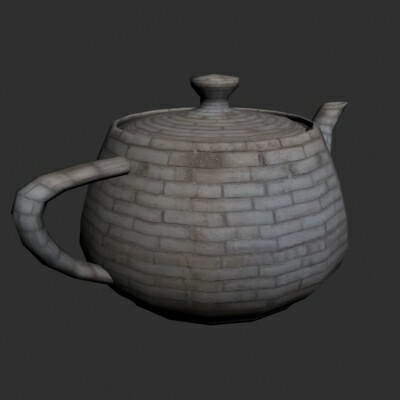 Here are the two textures used.
 As you can see from the image, the tan bricks blend into the grey bricks, keeping the same mapping coordinates. A few of the many uses for this include adding rust to metal, burnt wood, dirt pathways on rock, moss covered wood, wrinkles in fabric, etc.
Start with your textured mesh in 3D Max, similar to below.
As you can see from the image, the tan bricks blend into the grey bricks, keeping the same mapping coordinates. A few of the many uses for this include adding rust to metal, burnt wood, dirt pathways on rock, moss covered wood, wrinkles in fabric, etc.
Start with your textured mesh in 3D Max, similar to below.
 There are two ways to apply colors to the vertices.
 - You can either select each Vertex while the model is an Editable Mesh, then use the "Edit Vertex Colors" under the "Surface Properties" to manually assign the vertex colors.
- Or you can use the VertexPaint Modifier in the Edit Mesh section of the Modifier List. Select the paint brush and by right clicking on the model, you will be painting the vertices (To see which verticies you are painting click the "VertCol" Toggle).
 Note that neither method will show the end result in 3DS Max. To see the resulting effect you will have to import the model into unreal. It is best to just use black and white for coloring the vertices. The nature of Vertex Colors will cause the colors to automatically blend into each other so manual blending of vertex colors is often not necessary.
Once you have your mesh painted the way you want, you're ready to export. If you actually want to see how your model may look prior to exporting, you'll need to use a Blend material in 3D Max with a Vertex Color material in the Mask parameter, then render. Otherwise, export the mesh with vertex colors checked.
In the editor you will need to create shader comprised of the following textures (also shown below in the material tree):
Note that neither method will show the end result in 3DS Max. To see the resulting effect you will have to import the model into unreal. It is best to just use black and white for coloring the vertices. The nature of Vertex Colors will cause the colors to automatically blend into each other so manual blending of vertex colors is often not necessary.
Once you have your mesh painted the way you want, you're ready to export. If you actually want to see how your model may look prior to exporting, you'll need to use a Blend material in 3D Max with a Vertex Color material in the Mask parameter, then render. Otherwise, export the mesh with vertex colors checked.
In the editor you will need to create shader comprised of the following textures (also shown below in the material tree): - Combiner (Diffuse)
- TexCoordSource Modifier (Material1)
- Texture (the first base texture you import)
- TexCoordSource Modifier (Material2)
- Texture (the second base texture you import)
- Vertex Color
- TexCoordSource Modifier (Material1)
 All in all, you should have seven materials including your resulting Shader. Below are instructions on how to create each of these listed in the order you should create them.
After importing your base textures and the StaticMesh, go to the Texture Browser and create a new material. In the Material Class pull down menu, choose Vertex Color, and then fill in the package, group, and name info.
All in all, you should have seven materials including your resulting Shader. Below are instructions on how to create each of these listed in the order you should create them.
After importing your base textures and the StaticMesh, go to the Texture Browser and create a new material. In the Material Class pull down menu, choose Vertex Color, and then fill in the package, group, and name info.
 After clicking the "New" button, you're now finished creating this material. It simply tells any material that uses it to utilize the vertex colors of a mesh for the subsection it's in.
The next materials you will need to create are the TexCoordSource Materials. Create another new material but this time from the Material Class pull down menu, select TexCoordSource. You will need to create two of these (one for you base texture and one for your blend texture), and in the SourceChannel Material field assign your corresponding textures.
Now you will need to create a Combiner Material by selecting Combiner from the pull down menu. In Material1, place the TexCoordSource Material from your base texture. In Material2, place the TexCoordSource Material from your blend texture. In Mask, place the VertexColor you initially created. Also make sure that the CombineOperation should be CO_AlphaBlend_With_Mask and the AlphaOperation should be AO_Use_Mask.
Lastly, by selecting the Shader option from the Material Class pull down, you will create a Shader that utilizes all of these materials. Assign the Combiner Material you just created in the Diffuse channel and you're almost done!
Now apply your shader to your static mesh, and you should see the results.
After clicking the "New" button, you're now finished creating this material. It simply tells any material that uses it to utilize the vertex colors of a mesh for the subsection it's in.
The next materials you will need to create are the TexCoordSource Materials. Create another new material but this time from the Material Class pull down menu, select TexCoordSource. You will need to create two of these (one for you base texture and one for your blend texture), and in the SourceChannel Material field assign your corresponding textures.
Now you will need to create a Combiner Material by selecting Combiner from the pull down menu. In Material1, place the TexCoordSource Material from your base texture. In Material2, place the TexCoordSource Material from your blend texture. In Mask, place the VertexColor you initially created. Also make sure that the CombineOperation should be CO_AlphaBlend_With_Mask and the AlphaOperation should be AO_Use_Mask.
Lastly, by selecting the Shader option from the Material Class pull down, you will create a Shader that utilizes all of these materials. Assign the Combiner Material you just created in the Diffuse channel and you're almost done!
Now apply your shader to your static mesh, and you should see the results.

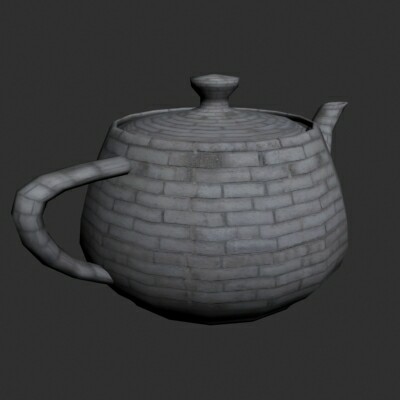
Blending from One Material to Nothing
Getting results similar to this...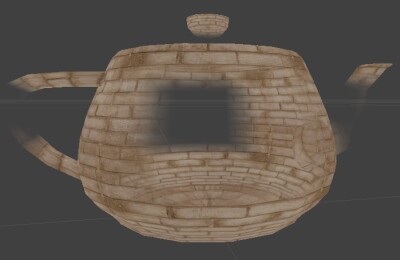 ...is just as simple. Using the same method for vertex painting, all you need to do is set up a new shader.
In the Diffuse entry, use your base texture. In the Opacity entry, use your VertexColor material. Now apply this shader to your static mesh.
Some of the applicable uses for this could be blending a waterfall mesh into the water above and below, or adding patches of dirt over various areas.
...is just as simple. Using the same method for vertex painting, all you need to do is set up a new shader.
In the Diffuse entry, use your base texture. In the Opacity entry, use your VertexColor material. Now apply this shader to your static mesh.
Some of the applicable uses for this could be blending a waterfall mesh into the water above and below, or adding patches of dirt over various areas.
Blending Materials with Two Different UV Channels
This is essentially handled the same way within 3D Max, with the exception of adding an additional UVW Map onto the stack, and telling it to use Map Channel 2. As you won't be able to see more than one channel at a time in the viewport, you can apply your second material and set it's Map Channel to 2 in the Material Editor.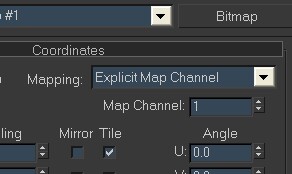 Once you have your second channel mapped the way you want it, you're ready to export.
Within UnrealED, create a new material, and choose TexCoordSource from the MaterialClass drop list. In the SourceChannel entry, put 1. In the Material entry, put your blend texture. This TexCoordSource material simply says to apply the texture to the specified map channel. For some reason, in the texture browser, the TexCoordSource material will only display a flat average color for the texture with any channel other than zero.
Now create a new combiner. In the Material1 entry, put your base texture. In the Material2 entry, put your TexCoordSource material. And in the Mask entry, place your VertexColor material. Next create a shader and place that combiner in the Diffuse channel to prevent any problems that may crop up from using a combiner that uses vertex colors on the mesh.
Once that's done, apply this Shader to your static mesh. You should then see both materials being applied using two different mapping coordinates.
Once you have your second channel mapped the way you want it, you're ready to export.
Within UnrealED, create a new material, and choose TexCoordSource from the MaterialClass drop list. In the SourceChannel entry, put 1. In the Material entry, put your blend texture. This TexCoordSource material simply says to apply the texture to the specified map channel. For some reason, in the texture browser, the TexCoordSource material will only display a flat average color for the texture with any channel other than zero.
Now create a new combiner. In the Material1 entry, put your base texture. In the Material2 entry, put your TexCoordSource material. And in the Mask entry, place your VertexColor material. Next create a shader and place that combiner in the Diffuse channel to prevent any problems that may crop up from using a combiner that uses vertex colors on the mesh.
Once that's done, apply this Shader to your static mesh. You should then see both materials being applied using two different mapping coordinates.