UDN
Search public documentation:
DevelopmentKitFirstScriptProject
日本語訳
中国翻译
한국어
Interested in the Unreal Engine?
Visit the Unreal Technology site.
Looking for jobs and company info?
Check out the Epic games site.
Questions about support via UDN?
Contact the UDN Staff
中国翻译
한국어
Interested in the Unreal Engine?
Visit the Unreal Technology site.
Looking for jobs and company info?
Check out the Epic games site.
Questions about support via UDN?
Contact the UDN Staff
Your first UnrealScript project
Document Summary: A guide for creating your first UnrealScript project in the Unreal Development Kit. Document Changelog: Initial part of the example game.Overview
This tutorial will guide you through setting up your first UnrealScript project for the UDK. This tutorial is not about creating a complete game with the UDK, nor will it give a detailed description of the game framework as it is present in the UDK.Setting up the environment
Before you start programming you will need to set up your development environment.Setting up UDK
Start off by getting the latest version of the UDK. Execute the installer and follow the instructions. It is best to install the UDK in an easy to find directory on your system, and not hidden away somewhere in the "Program Files" directory. You will be visiting the UDK directory quite often during development. New versions of the UDK will be made available regulary. But it is wise not to jump the gun and update to the latest version as soon as it is available. Certain things might have changed that could break your current project. When a new UDK version is released make sure your project is in a stable state. And then migrate to the newer version and make sure everything still works.UDK directory layout
The UDK installation directory has the following layout (some might not exist until the first time you run the UDK):-
Binaries; Contains various utilities.-
ActorX; ActorX plugins for various 3D Modeling programs. -
FaceFXPlugins; FaceFX plugins for various 3D Modeling programs. -
InstallData; Files used during the installation of the UDK. -
SpeedTreeModeler; SpeedTree tools. -
Win32; This directory contains the UDK executable and various required libraries. -
Win64; Here you will find the 64bit versions of the UDK executables which can be used when you have a 64bit version of MS Windows. -
Windows; Contains an install file to install various runtime libraries required by the UDK. These libraries have already been installed on your system during the setup.
-
-
Development; The development directory.-
Src; This directory is used for all source files, including UnrealScript source. The directory already contains the UnrealScript sources of the code included with the UDK. You will be adding your own source to the same directory.
-
-
Engine; This directory is used for the base files of the UnrealEngine. You should not change any of the content in this directory, that's what theUDKGamedirectory is for. Everything in this directory can be used by your application even if you are creating a commercial UDK application.-
Config; This contains the base configuration files, these files are usually inherited by the configuration files in theUDKGamedirectory. -
Content; Content packages. -
EditorResources; Resource files used by the editor. -
Localization; Localization files. Every language as its own subdirectory containing the localized files. -
Shaders; Shader source files. -
Stats; Template files used to create reports about various development statistics.
-
-
UDKGame; This is the directory you will be adding new content to.-
Build -
Config; This directory contains two types of configuration files, the default configuration files, and the materialized configuration files which will be updated over time. The default configuration files provide the default configuration for the system and will never be updated by the engine. -
Content; Contains all content packages (including levels) for your application. You may use any content included in these directories in a commercial UDK application except for any assets marked as a SkeletalMesh in the Content Browser (see ContentBrowserReference). There is no fixed setup for the subdirectories, it all depends on the configuration. -
Localization; The localization files. -
Logs; This directory is used for log files and crash reports. -
Movies; This directory is reserved for the Bink movies which can be shown in-game. Note: you are required to include and show theUE3_logo.bikmovie in your application. -
Script; This directory contains the compiled script packages. -
Splash; Contains the splash screens for the editor and game while they are starting.
-
IDE/Editor
The UDK does not contain an editor for writing UnrealScript. UnrealScript is much like Java. The source code is stored in plain text files. So you can use your favorite text editor to write your code. There are however some special editors that provide more functionality.nFringe
The most notable editor at the moment is nFringe by Pixel Mine Games. nFringe provides a total integrated development environment for UE3, and thus also for the UDK. nFringe builds upon the Visual Studio IDE provided by Microsoft. It works with both the professional version of Visual Studio as with the free Visual Studio Express. nFringe is free for non-commercial projects. More information about nFringe can be found here. To install nFridge follow these instructions. You should use nFringe in the Licensee Project mode rather than the "General/Mod Project" mode. This is because the UDK behaves pretty much as a true licensed UE3, but with only UnrealScript access. The project you set up is not specifically for one package, it is for the whole UDK as a single project. So you should store the project and solution files inUDK\Development\src, just like the instructions mention.
nFringe does not automatically manage the UnrealScript packages. You will manually have to create the proper directory structure for each package, and also update the configuration so that the package will be included in the compilation process. See the project setup for the details.
WOTgreal
And other IDE specifically written for the UnrealEngine is WOTgreal. WOTgreal has partial support for UnrealEngine3. Various features of WOTgreal do not work well with the UE3 set up. But you can still write UnrealScript and use the code insight and code completion features. To use WOTgreal you first need to download the latest stable release. After that download the latest development release and extract the content to the installation directory overwriting the previous files. To use WOTgreal in Windows Vista you to start it with administrative privileges.
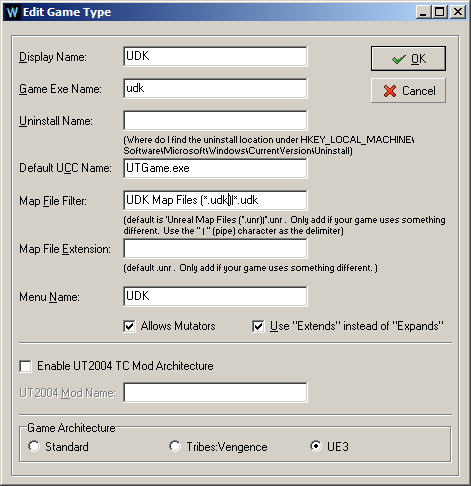
- Display name
-
UDK(or any name you like) - Game EXE name
-
udk - Menu name
-
UDK - Use "extends" instead of "expands"
- Game Architecture
- "UE3"
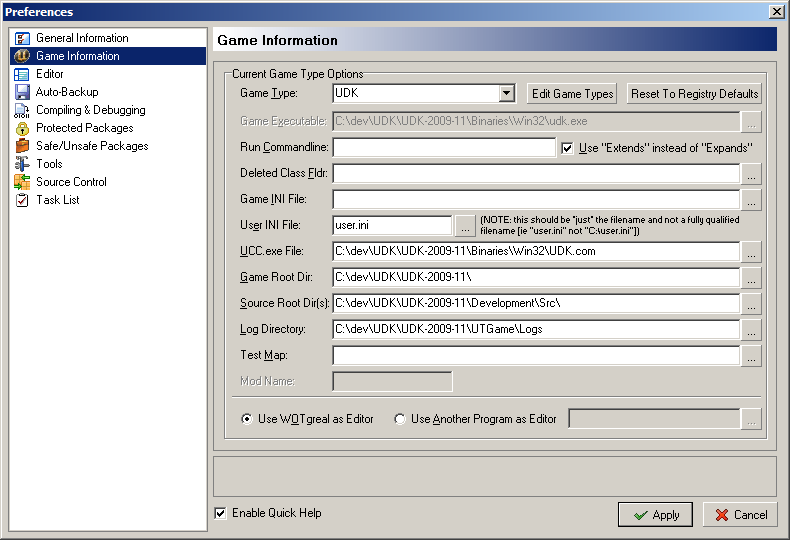
- UCC.exe File
-
{UDK directory}\binaries\win32\udk.com - Game Root Dir
-
{UDK directory} - Source Root Dir
-
{UDK directory}\Development\Src
udk.com and not udk.exe.
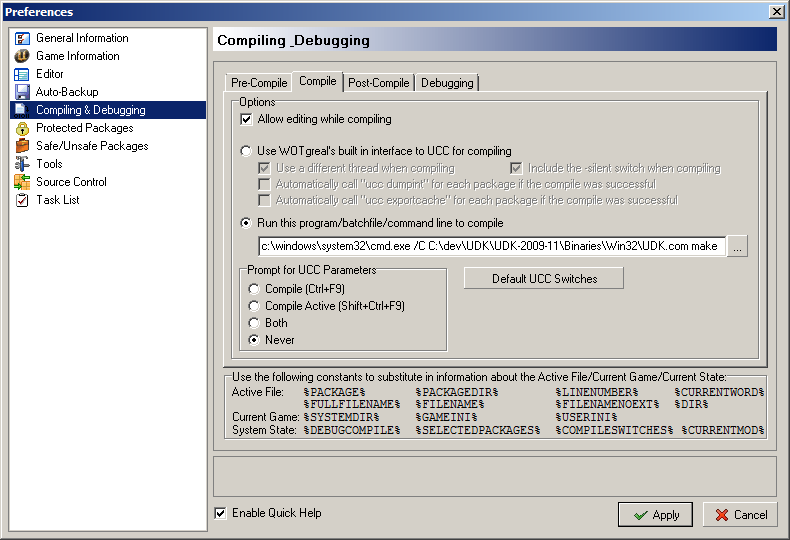

c:\windows\system32\cmd.exe /C {UDK directory}\binaries\win32\udk.com make.
In the "Post-Compile" tab enter the following location as the log name: {UDK directory}\UDKGame\Logs\Launch.log.
After these steps WOTgreal should be usable. to populate the packages and classes trees press F5. This make take a while.
WOTgreal does not show UnrealScript interfaces, but you can use the editor to write them. Pre-processor directives are also not recognized, but as long as you do not use them in declarations you should not encounter any issues.
Unlike nFringe WOTgreal does create the proper directory structure for UnrealScript packages. However, it does not update the configuration to have the package included during the compilation. See the project setup section for additional information.
Other editors
Of course you can also choose you use your favorite text editor. For quite some editors there are syntax highlighers for UnrealScript, and maybe other advanced features. See the community driven UnrealWiki for more information about other editors. When using a normal text editor you might also want to use the tool called UnCodeX. It provides a class and package tree like you would also find in nFringe or WOTgreal, and various other features that are a useful addition to the plain text editors. You should download the latest stable release, and after installation download the latest development release which provides support for UE3.Other important things
In the near future when the development of your application takes off you might want to think about using a version control system. A version control system can serve two important roles. The most important role of all is that it provides a backup and track record of your development. When you make a mistake in your development you could easily restore an earlier version. The second important role is that it will allow you to work with multiple people on the same project.Example application
This section will discuss the development of a small application for the UDK. We are going to call this applicationCluOne.
This small application does not do much. It provides a simple system to request some information about the in game element you are currently looking at.
Project setup
 As mentioned earlier, the directory
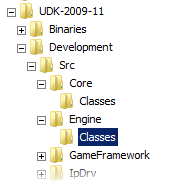
 UDK\Development\src is the location for the source code. That directory already contains the source code for all the UnrealScript classes in the UDK. Every subdirectory is for a single package.
The source code of CluOne should be added to this directory. The example application is a small application, thus a single package will suffice. Create a directory called CluOne in the UDK\Development\src directory. In that CluOne directory, create another directory called Classes. The UnrealScript compiler looks for the UnrealScript code in the UDK\Development\src\*\Classes directories. All other content in the package directories is ignored.
Even though the CluOne directory exists in the src directory the compiler will not pick it up, automatically. The configuration file needs to be updated to register the CluOne package as a valid UnrealScript package.
Open the file UDK\UDKGame\Config\UDKEngine.ini and look for the section called [UnrealEd.EditorEngine]. In this section you see some entries called EditPackages. These are the default packages the compiler will consider for compiling. EditPackages are reserved for the base UDK packages, custom packages should be added as ModEditPackages.
Thus for the CluOne package the entry ModEditPackages=CluOne should be added. The order in which packages are listed in the EditPackages and ModEditPackages is of importance. It defines the order in which the packages will be compiled, which influence the the class hierarchy. A class cannot be compiled when its parent class has not been compiled yet. The UnrealScript compiler is not as sophisticated as other compilers, such as the Java compiler, it can not figure out the order of compilation for itself.
UnrealScript Class Hierarchy
The UDK comes with a lot of UnrealScript classes--over 2000 of them. It is not important to know what all these classes do. It is best to use nFringe, WOTgreal or UnCodeX to inspect the whole class hierarchy. There are two very important and quite distinct base classes. First there is the base classObject, from which all other UnrealScript classes are derived. Object defines a lot of core functions, including various operators. The second important class is Actor. The Actor class is the base class for all "moving" or "living" elements in the game. All visible elements in a level are Actors, but not all Actors are visible. For example, all subclasses of Info are invisible by default. Object classes are used for utility or lightweight functionality, but also for the user interface. UnrealScript classes that need to have network functionality (i.e. communicate between client and server) need to be a subclass of Actor.
This tutorial is going to extend the following classes:
- GameInfo
- This is the main class for the game logic. When creating an application with the UDK you will mostlikely create a subclass of this game.
- PlayerController
- This class represents a player, not the visible part, but it processes the input and performs actions. The actual visual representation of the player (if there is any) is performed by a
Pawnsubclass.
GameInfo subclass
The entry point for most applications is aGameInfo subclass. This class defines which PlayerController class is created, and various other important game logic classes. For this tutorial the class is briefly skimmed, there is too much information to explain it all.
Class declaration
To create a new class you simply create a file with the same name as you want the class to be called in theClasses directory of the package that should contain the class. For the CluOne application a GameInfo subclass is created with the name CluOneGame and it is saved to the file UDK\Development\Src\CluOne\Classes\CluOneGame.uc.
The class declaration of an UnrealScript class is as follows:
class CluOneGame extends GameInfo;Note that it ends with a semicolon (;), and that there are no curly braces. Every thing after the class declaration belongs to that class. Only one class can be declared per file.
The new player controller
TheCluOne application uses a new PlayerController class. When a user connects to the game, the GameInfo class creates a controller for this user. In order for the GameInfo class to create the correct class the following code is added to the end of the source.
defaultproperties
{
    PlayerControllerClass=class'CluOnePlayerController'
}
The defaultproperties block defines default values of certain variables. This is much like variable initializers in other programming languages (but not exactly the same). The default GameInfo implementation creates a PlayerController instance based on the value of the PlayerControllerClass variable. There are of course other ways to create the correct class instance, but this is the easiest and best method.
Greeting the user
There is a whole chain of events triggered in theGameInfo class when a user connects to the game server. (Even in single player, or "StandAlone" mode, you can think of the Unreal Engine as a "game server")
Three of these events are PreLogin, Login, and PostLogin. The event names give away their order. At the PostLogin event the user is completely connected, and can be interfaced with.
At this point the user should be greeted:
event PostLogin( PlayerController NewPlayer )
{
    super.PostLogin(NewPlayer);
    NewPlayer.ClientMessage("Welcome to the grid "$NewPlayer.PlayerReplicationInfo.PlayerName);
    NewPlayer.ClientMessage("Point at an object and press the left mouds button to retrieve the target's information");
}
The default player name is defined by the variable DefaultPlayerName, which is defined as a localized string. The proper way to change the default name is to update the localization files. But for now we will hardcode the players name using the following function:
event PlayerController Login(string Portal, string Options, const UniqueNetID UniqueID, out string ErrorMessage)
{
	local PlayerController PC;
	PC = super.Login(Portal, Options, UniqueID, ErrorMessage);
	ChangeName(PC, "Clu", true);
    return PC;
}
PlayerController subclass
The most exciting stuff goes on in the custom PlayerController class. Each new class needs to be in its own file with the same name as you want the class to be called in theClasses directory of the package that should contain the class. For the CluOne application a PlayerController subclass is created with the name CluOnePlayerController and it is saved to the file UDK\Development\Src\CluOne\Classes\CluOnePlayerController.uc.
We start of by the simple declaration of the class:
class CluOnePlayerController extends PlayerController;
Crosshair
By default the PlayerController class does not show a crossair. Various existing subclasses do show crossairs. There are various ways to eventually draw the crossair. You could delegate it to an inventory item the player is currently holding. Or you could draw it from the HUD. Or you can draw it directly from the PlayerController. TheDrawHud(...) function is called from the current HUD on the PlayerController so that it can draw additional stuff on the screen. The following code draws a nice little green cross in the middle of the screen.
/**
 * Draw a crosshair. This function is called by the Engine.HUD class.
 */
function DrawHUD( HUD H )
{
	local float CrosshairSize;
	super.DrawHUD(H);

	H.Canvas.SetDrawColor(0,255,0,255);

	CrosshairSize = 4;

	H.Canvas.SetPos(H.CenterX - CrosshairSize, H.CenterY);
	H.Canvas.DrawRect(2*CrosshairSize + 1, 1);

	H.Canvas.SetPos(H.CenterX, H.CenterY - CrosshairSize);
	H.Canvas.DrawRect(1, 2*CrosshairSize + 1);
}
The fire button
Now that we can see what we are looking at. We need some way to initiate the "looking at stuff". We could always look, but we decided to only look for specific information when the user presses the left mouse button. Through the input handling system the left mouse button is mapped as the fire action. The fire action is actually a sequence "console commands" which are executed. (See the fileEngine\Config\BaseInput.ini)
Functions with the exec modifier defined in certain classes (like the player controller class) are accepted as the so called "console commands". One of the console commands executed by the fire action is StartFire. The StartFire command is defined in the PlayerController class.
In our custom player controller class we are going to override this function and add our own logic to it:
/*
 * The default state for the player controller
 */
auto state PlayerWaiting
{
	/*
	 * The function called when the user presses the fire key (left mouse button by default)
	 */
	exec function StartFire( optional byte FireModeNum )
	{
		showTargetInfo();
	}
}
As you can see the StartFire function is actually declared in the a state called PlayerWaiting. Actor classes in the UnrealEngine are implicit state machines. This means that depending on the current state of the actor it calls one implementation of a function rather than the other one. So, depending on a state of an actor you could have different behavior when the fire button is pressed. The default state (i.e. "auto state") for the player controller is the PlayerWaiting state. So that is why we overwrote the StartFire function in that state.
The actual code to show information of what we are looking at is implemented in the showTargetInfo function.
What we are looking at
In order to figure our what the current player is looking at we need to trace the line of sight up to the first thing we encounter. This is done using thetrace(...) function defined in the Actor class. Trace functions are used a lot to figure our if things are visible, or used to set targets for weapon fire.
We use the trace function to find the first game element the line of sight encounters. When something was encountered we play a sound and print a few lines of information about the element.
/*
 * Print information about the thing we are looking at
 */
function showTargetInfo()
{
	local vector loc, norm, end;
	local TraceHitInfo hitInfo;
	local Actor traceHit;

	end = Location + normal(vector(Rotation))*32768; // trace to "infinity"
	traceHit = trace(loc, norm, end, Location, true,, hitInfo);

	ClientMessage("");

	if (traceHit == none)
	{
		ClientMessage("Nothing found, try again.");
		return;
	}

	// Play a sound to confirm the information
	ClientPlaySound(SoundCue'A_Vehicle_Cicada.SoundCues.A_Vehicle_Cicada_TargetLock');

	// By default only 4 console messages are shown at the time
 	ClientMessage("Hit: "$traceHit$"  class: "$traceHit.class.outer.name$"."$traceHit.class);
 	ClientMessage("Location: "$loc.X$","$loc.Y$","$loc.Z);
 	ClientMessage("Material: "$hitInfo.Material$"  PhysMaterial: "$hitInfo.PhysMaterial);
	ClientMessage("Component: "$hitInfo.HitComponent);
}
Tracing is done from a starting point to a given end point. As start point we use the current location of the player controller. As end point we try to point to "infinity". This is done by extending the current location of the player controller with a normalized vector of the current rotation. The rotation defines the angle of the camera. The normalized vector is multiplied with the maximum distance of the world (which is between -32767 and 32768 in size). This is some basic vector math, something you will need to understand properly if you want to do anything in 3D.
The ClientMessage(...) function prints some information in the console of the current player. This function is also used for chatter between players or certain game events. It's also a nice way to print debug information on screen (but remember to remove the debug code in that case before you ship your application.)
End of the example
This is the end of the tiny UnrealScript example. There is much more to know before you can write a real application with the UDK. Check the end of this document for additional information about UnrealScript and the game framework of the UnrealEngine. You can download the source code of this example here.Compiling
There are a couple of methods to compile your source code. when you are using an IDE with UDK support you could easily press the compile button to compile your project. An other way to compile the code is to use the UnrealFrontend. When you start the frontend simple press the "Make" button in the toolbar and it will initialize the compiler. You can press the button as often as you'd like. It will only compile code when there have been changes to the source files. You can also initiate a full recompile. You can do this by pressing the down arrow next to the make button and select "Full Recompile".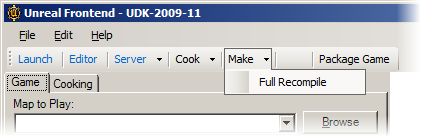 One problem with the frontend is that it does not always show the full compile output. And therefore requiring you to open the log file by hand.
The third way, and actually the way the previous two methods start the compiler, is by executing a commandline. A normal compile is issued by
One problem with the frontend is that it does not always show the full compile output. And therefore requiring you to open the log file by hand.
The third way, and actually the way the previous two methods start the compiler, is by executing a commandline. A normal compile is issued by
C:\UDK\UDK-2009-11\Binaries\Win32\udk.com makeTo perform a full recompile simply add the
-full argument on the commandline.
You should use the udk.com executable when you execute console command rather than the udk.exe executable. They both have the same effect, but the udk.com command will print output to the standard output, where the udk.exe will show it in a special window. When you want to use the compiler in build script (like a Makefile or Ant build script) you need to have the output on the standard output. In this case you also want to add the commandline switch -unattended. This suppresses any interactive prompts during the compilation.
If your packages are not listen in the compilation process, then make sure you added them as ModEditPackages in the [UnrealEd.EditorEngine] section of the UDKGame\Config\UDKEngine.ini file.
Testing
When the code compiled succesfully the application can be tested so see if the new functionality behaves as it should. In most cases the application is tested by starting the UDK in client mode with a given launch URL. To start theCluOne application the UDK should be started with:
C:\UDK\UDK-2009-11\Binaries\Win32\udk ExampleMap?game=CluOne.CluOneGameIn this case the launch URL is
ExampleMap?game=CluOne.CluOneGame. The URL starts with either a map name (in this case ExampleMap) or a hostname/ip for a server to join. After this comes a set of ?key=value elements. These control various settings. The most important key is game, it defines which GameInfo subclass to create when starting the game. The value is the fully qualified name of the class, i.e. PackageName.ClassName. Other valid ?key=value elements are usually determined by the GameInfo subclass that is created.
The map ExampleMap is used because it is a small map, so it loads quickly.
Debugging
An the moment of writing there is no fancy debugger support for the UDK. Maybe in the future nFringe will enable proper UnrealScript debugging for the UDK, just as it has for UT3. Then you will be able to set breakpoints and step through the code. But until that happens you are stuck with classic debugging methods. Usually when things do not work as you expected there are two possible causes:- The code is not called
- You are trying to access unset data (i.e. a null pointer reference)
C:\UDK\UDK-2010-05\Binaries\Win32\udk.exe -logThis will open a console window with live logging output. Otherwise you might need to close the client first before you can read the log file in the
UDKGame\Logs directory.
When inspecting the log output you should watch for lines like the following:
Log: Accessed None 'AccessControl'
        UTDeathmatch DM-Deck.TheWorld:PersistentLevel.UTDeathmatch_0
        Function Engine.GameInfo:Login:0358
An "Accessed None" is the UnrealScript equivalent of a null pointer exception. The log tells you the name of the variable that was being read, but which was none/null, in this case AccessControl. It also tells you the function where this happened: Login in the class Engine.GameInfo. The number 0358 is not the line number. It is actually the byte-code offset. So just ignore it, because there is no easy way to convert that to a line number. But you at least know where something went wrong.
A good way to keep track on what is happening, and what is not happening, is to add additional information to the log output. You can simply do that by writing code like this:
`log("This will add a line to the log output");
Note the back-tick (` not to be confused with the quote character ') in front of log. This is actually a preprocessor directive that creates the real logging call. The full signature for this macro is:
`log(logMessage,expression,prefix);
-
logMessage - this is the message you want to log.
-
expression - an expression, if provided it needs to be true for the message to be logged.
-
prefix - a name to use to prefix your log message, this is very useful to distinguish your log message from all others
function foo(Bar quux)
{
    if (quux == none)
    {
        `log("foo was called but quux was none");
    }
    else {
        `log("Performing foo on "$quux)
    }
}
For other useful debug macro directives see the file Development\src\Core\Globals.uci.
An other very useful feature for debugging is the function ScriptTrace(), defined in Object. Calling this function will dump a stack trace to the log output. This will allow you to see the chain of function calls that lead up to the current point.
One important note, make sure that your code compiles without warnings. A warning is not an issue at compiletime, but it often results in errors when the code is executed.
Further reading
- UnrealScriptReference
- UnrealScriptCheatSheet: Convenient printable summary of UnrealScript syntax.
- Mastering Unreal: UnrealScript Baptism By Fire
- Mastering Unreal: UnrealScript Classes
- Mastering Unreal: UnrealScript Functions
- Mastering Unreal: UnrealScript States
- Mastering Unreal: UnrealScript Delegates
- Mastering Unreal: UnrealScript Interfaces
- Mastering Unreal: UnrealScript PreProcessor
- ConfigurationFiles
- NetworkingOverview
