UDN
Search public documentation:
MatineeUserGuide
日本語訳
中国翻译
한국어
Interested in the Unreal Engine?
Visit the Unreal Technology site.
Looking for jobs and company info?
Check out the Epic games site.
Questions about support via UDN?
Contact the UDN Staff
中国翻译
한국어
Interested in the Unreal Engine?
Visit the Unreal Technology site.
Looking for jobs and company info?
Check out the Epic games site.
Questions about support via UDN?
Contact the UDN Staff
UE3 Home > Unreal Editor and Tools > Unreal Matinee User Guide
UE3 Home > Matinee & Cinematics > Unreal Matinee User Guide
UE3 Home > Cinematic Artist > Unreal Matinee User Guide
UE3 Home > Matinee & Cinematics > Unreal Matinee User Guide
UE3 Home > Cinematic Artist > Unreal Matinee User Guide
Unreal Matinee User Guide
- Unreal Matinee User Guide
Overview
Opening Matinee
 button in the level editor's tool bar or selecting UnrealMatinee in the level editor's View menu and then selecting the desired matinee sequence from the list that appears. It is recommended that you set at least one of your viewports to `realtime' mode when using Matinee, so it will be updated as you playback or scrub through your sequence.
When working within Matinee, Actors in the level will be moved around and have their properties changed as part of previewing the sequence. However, when you exit Matinee, all level state will be restored to the way it was when you entered Matinee. For this reason, you should avoid trying to modify the level or create new Actors while in Matinee, and you will not be able to save the level while Matinee is open. If you try to save your map with Matinee open you will be prompted to close it first.
button in the level editor's tool bar or selecting UnrealMatinee in the level editor's View menu and then selecting the desired matinee sequence from the list that appears. It is recommended that you set at least one of your viewports to `realtime' mode when using Matinee, so it will be updated as you playback or scrub through your sequence.
When working within Matinee, Actors in the level will be moved around and have their properties changed as part of previewing the sequence. However, when you exit Matinee, all level state will be restored to the way it was when you entered Matinee. For this reason, you should avoid trying to modify the level or create new Actors while in Matinee, and you will not be able to save the level while Matinee is open. If you try to save your map with Matinee open you will be prompted to close it first.
Matinee Interface
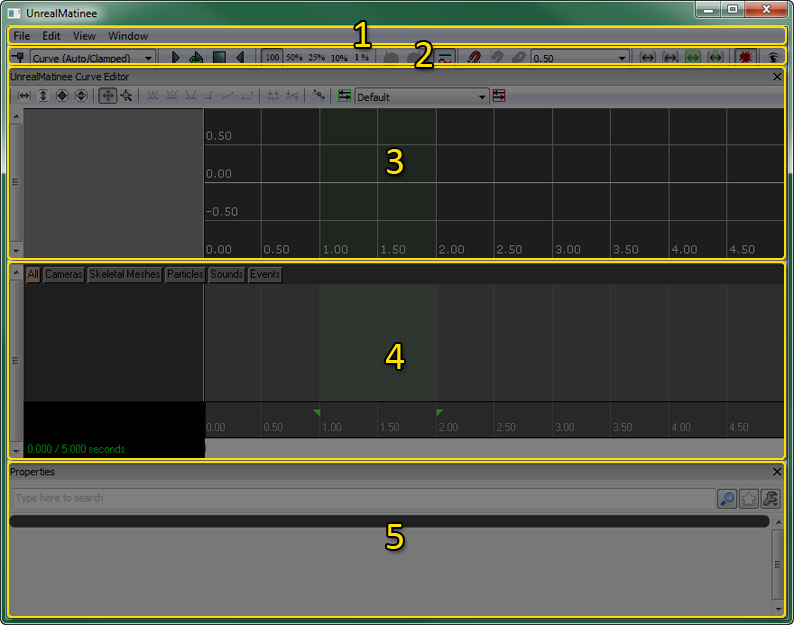
Menu Bar
File
- Import... - Imports a FBX / COLLADA or scene.
- Export All... - Exports the entire scene (though some items cannot be exported) to a FBX / COLLADA file for editing in an external 3D content creation package.
- Export Sound Cue Info... - Exports all SoundCue information for the Matinee sequence to a CSV file.
- Bake Transforms on Export - Toggles whether transforms are baked before exporting the scene.
Edit
- Undo - Undo the last completed action.
- Redo - Redo the last undone action.
- Delete Selected Keys - Deletes the keys currently selected in the timeline. Selecting keys in the Curve Editor does not select them in the timeline.
- Duplicate Selected Keys - Duplicates (with a slight time offset) the keys currently selected in the timeline.
- Insert Space At Current - Inserts the specified amount of time into the matinee sequence at the current time cursor position.
- Stretch Section - Stretches (or shrinks) the portion of the sequence contained in the loop section to fit the specified amount of time.
- Delete Section - Deletes the portion of the sequence contined in the loop section.
- Select Keys In Section - Selects all the keys contained within the loop section.
- Reduce Keys - Reduces the amount of keys in the currently selected track. This can be useful for tracks that were edited in an external application and may have quite a bit of redundant keys that are not needed to get the desired animation. See Key Reduction for more details.
- Save As Path-Building Positions - Saves the current time and positions of moving actors to use when building paths.
- Jump To Path-Building Positions - Moves the time cursor to the saved path-building position.
- Configure Keyboard Shortcuts - Opens the Hotkeys Editor.
View
- Draw 3D Trajectories - Toggles display of 3D movement paths in the viewports. Display of paths for individual tracks can be toggled on an off by clicking the
 button on the track in the track list.
- Show Trajectories for All Tracks - Enables display of 3D movement paths for all movement tracks in the sequence.
- Hide All Trajectories - Disables 3D movement paths for all movement tracks in the sequence.
- Snap keys - Toggles snapping of the time cursor and keys.
- Snap Time to Frames - Snaps the timeline cursor to the frame rate specified in the Snap Size dropdown. Only enabled if snap size setting is in frames per second.
- Fixed Time Step Playback - Locks playback rate to the framerate specified in the Snap Size dropdown. Only enabled if the snap size setting is in frames per second.
- Show Frame Numbers in Anim Tracks - Toggles display of frame numbers instead of time in seconds for the current cursor position for Anim Control tracks.
- Show Cursor Position for All Anim Keys - Toggles whether cursor position info for Anim Control tracks should only be displayed for the currently selected Anim Control track or for all Anim Control tracks in the sequence.
- Zoom To Time Cursor Position - Toggles whether the timeline should zoom in or out on the current cursor position or on the center of the visible timeline.
- Display Frame Stats in Viewport - Toggles display of frame statistics in the viewport.
- Fit View to Sequence - Zoom timeline to the entire sequence.
- Fit View to Selected - Zoom timeline to the selected key(s).
- Fit View to Loop - Zoom timeline to loop section.
- Fit View/Loop to Sequence - Set start and end of loop section to the start and end of the entire sequence.
- Enable Gore in Editor Preview - Toggles display of gore in editor preview.
- Toggle Curve Editor - Toggles display of the Curve Editor.
Window
- UnrealMatinee Curve Editor - Toggles display of the Curve Editor.
- Properties - Toggles display of the Properties Pane.
Tool Bar
What follows is a description of each of the toolbar buttons, from left to right as they appear on the toolbar.| Icon | Description |
|---|---|
 | Add keyframe at current position on the selected track. |
 | Sets the default InterpMode to use when adding new keys. |
 | Start preview playback from current position. |
 | Loop preview playback of loop section. |
 | Stop preview playback. |
 | Start preview playback in reverse. |
 | Adjust preview playback speed. |
 | Undo last action. |
 | Redo last undone action. |
 | Toggles display of the Curve Editor. |
 | Toggles snapping of the time cursor and keys. |
 | Snaps the timeline cursor to the frame rate specified in the Snap Size dropdown. Only enabled if snap size setting is in frames per second. |
 | Locks playback rate to the framerate specified in the Snap Size dropdown. Only enabled if the snap size setting is in frames per second. |
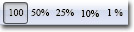
 | Sets the timeline granularity for snapping and visualiization purposes. |
 | Zoom timeline to the entire sequence. |
 | Zoom timeline to the selected key(s). |
 | Zoom timeline to loop section. |
 | Set start and end of loop section to the start and end of the entire sequence. |
 | Toggles display of gore in editor preview. |
 | Launches the Gamecaster Recording Window for Matinee. |
 | Start a Matinee movie capture. |
Curve Editor
The Curve Editor allows you to graphically visualize and edit the animations curves used by the tracks in the Matinee sequence. Tracks that have animation curves that can be edited in the curve editor in Matinee have the toggle button. Clicking this button will send that track's curve information to the Curve Editor where the curve will become visible and the track info will appear in the track list.
 See the Curve Editor User Guide page for details about working with curve information in the curve editor.
Timeline Pane
The Timeline Pane contains a list of all the folders, groups, and tracks contained within the Matinee sequence and shows their keyframe information on a timeline where they can be edited. It consists of the following areas: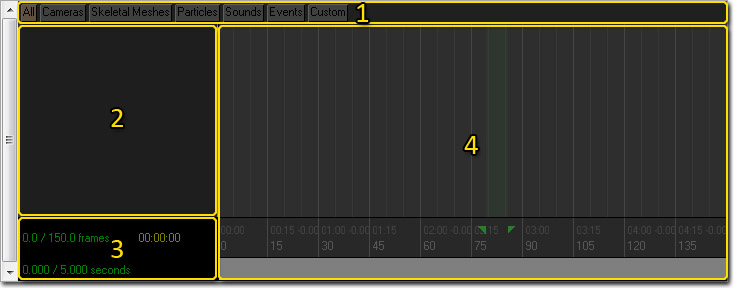
Group Tabs
 The tabs across the top of the Timeline Pane show all the Group Tabs that exist in the current Matinee sequence. Group Tabs are a handy way of organizing groups and tracks based on their function. Their use is completely optional. For very simple sequences, you could simply leave all groups and tracks in the default All tab. But with complex sequences, like those used to create in-game cinematics, you will do best to make use of these tabs as the number of groups and tracks in the sequence can quickly add up and become unwieldy to navigate. The All tab will always show all the groups and tracks in the sequence so adding related tracks to a corresponding group tab can be a quick and easy way to find and edit those groups and tracks. You can create your own custom tabs in addition to those provided by default to further organize your groups and tracks based on any criteria you choose.
Group and Track List
 The Group and Track List shows all the groups and tracks in the currently selected group tab. It will be empty by default in a new Matinee sequence.
Timeline
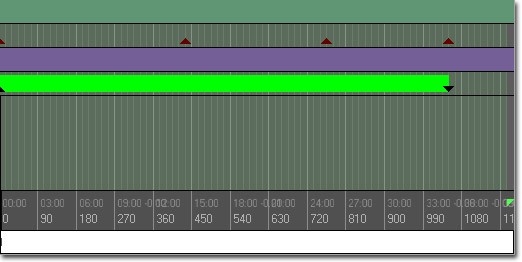 The timeline is a graphical representation of all the keyframes for all the tracks in the seqence. It shows time along the bottom horizontally and also contains the start and end markers for the loop section (in green) and for the seqeunce itself (in red). Keys can be selected and modified directly in the timeline. Some keys are displayed simply as triangles while other keys are shown as triangles followed by a colored bar. These are keys for animations, sounds, etc. that have a specific duration. The colored bar shows the duration of the action the key is triggering.
Properties Pane
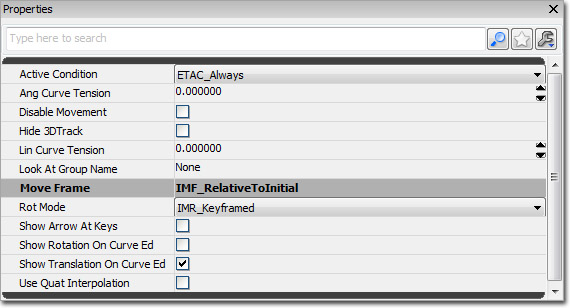 The Properties Pane is a standard Unreal properties window which displays the properties of the currently selected folder, group, or track in the Timeline Pane's track list.
Controls
Mouse Controls
| Click-drag on background | Pan sequence around |
| Mouse wheel | Zoom in and out |
| Click on key | Select keyframe |
Keyboard Controls
| Ctrl-click on object | Toggle selection of object |
| Ctrl-drag | Move current selection |
| Ctrl-Alt-drag | Box select |
| Ctrl-Alt-Shift-drag | Box select (add to current selection) |
Hot Keys
| Enter | Add keyframe at current position on the selected track |
| Ctrl-W | Duplicate selected keyframes |
| Delete | Delete selected keyframes |
| Left/Right Cursor | Jump to previous/next key on selected track |
| Up/Down Cursor | Move selected group up/down in list |
| Ctrl-Z | Undo |
| Ctrl-Y | Redo |
| R | Razor Tool (for AnimControl Track - see later) |
Creating A Matinee Action
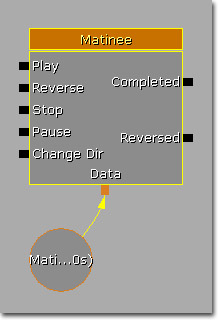 The `Matinee Data' is the actual keyframe data for the sequence. You must have a `Matinee Data' object connected to your Matinee Action for it to work. The different inputs on the left allow your Kismet script to control the playback of the Matinee sequence, in a manner similar to a DVD player. The Completed and Reversed outputs on the right are fired when the sequence finishes - `Completed' is fired when the sequence reaches the end and finishes, and `Reversed' is fired if the sequence is playing backwards and reaches the start and finishes. Activating the Stop input does not fire Completed or Reversed. The Object Variables connected to the Matinee Action are the Actors that are going to be modified by the sequence.
There are a few options you can set for the Matinee Action in Kismet:
The `Matinee Data' is the actual keyframe data for the sequence. You must have a `Matinee Data' object connected to your Matinee Action for it to work. The different inputs on the left allow your Kismet script to control the playback of the Matinee sequence, in a manner similar to a DVD player. The Completed and Reversed outputs on the right are fired when the sequence finishes - `Completed' is fired when the sequence reaches the end and finishes, and `Reversed' is fired if the sequence is playing backwards and reaches the start and finishes. Activating the Stop input does not fire Completed or Reversed. The Object Variables connected to the Matinee Action are the Actors that are going to be modified by the sequence.
There are a few options you can set for the Matinee Action in Kismet:
- Client Side Only - This property tells the engine that the sequence does not affect any part of gameplay, and therefore does not need to be replicated, or performed on networked machines.
- Force Start Pos - If checked, tells the sequence to always start playback from the time* - or timeline position* - indicated by the ForceStartPosition property.
- Force Start Position - Sets a designated position along the timeline from which to start the animation when the Play input is activated. Requires Force Start Pos to be checked.
- Interp For Path Building - If checked, tells the sequence to jump to the time indicated in the Path-Building Position in the timeline when paths are being built.
- Is Skippable - If checked, allows the CANCELMATINEE console command to be used to skip the sequence.
- Looping - If checked, causes the sequence to loop back to the beginning when the end is reached.
- No Reset On Rewind - If checked, causes any actors who are affected by Movement tracks that are using RelativeToInitial interpolation to use the initial position set at the current location when the sequence is rewound. This means that an actor will begin the next loop of the animation from the same location as where the animation ended
- Play Rate - Sets a multiplier for the final speed at which the animation plays back. A value of 1 is equal to normal real-time speed.
- Rewind If Already Playing - This property will cause the animation to automatically rewind back to the beginning if a user activates the Play input again during playback.
- Rewind On Play - This property will cause the animation to always start from the beginning when the Play input is activated, even if the animation was paused.
Movers
Working with Groups and Tracks
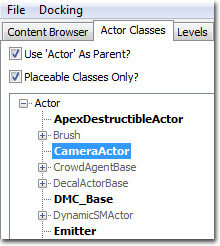
Creating A New Group
To create a new Group in your Matinee sequence, first select the Actor in the level that you wish to modify. Then right-click in the gray bar down the left of Matinee and select `Add New Group' (we will talk about Director Groups and AI Groups later).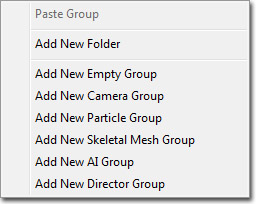 You will be prompted for a name for the new Group - it should be unique within that Matinee sequence, and should not contain spaces. When you choose OK, you should then see a new Group header. If you now look at your Matinee Action in Kismet, you can see it has created a new variable connector with the name of your Group, and a new Object variable containing a reference to the Actor you wanted that Group to work on. It is possible to connect multiple Actors to the same Group connector, which is very useful if you want to control the brightness of a number of lights in the same way over time for example.
The little colored bar in the Group header is the editor `Group color'. This is used for various things in Matinee to help you identify which objects in the scene are controlled by which Group in Matinee. It can be changed by selecting the Group and adjusting the GroupColor properties at the bottom of the window. Right clicking on the Group title allows you to Rename or Delete the entire Group. Once you have a Group selected, pressing the Up and Down arrow keys allows you to move it around in the list, which can be useful for keeping similar Groups together.
Note that whenever you select a Group (or Track in a Group) the Actor in the level will be selected for you, and vice versa.
You will be prompted for a name for the new Group - it should be unique within that Matinee sequence, and should not contain spaces. When you choose OK, you should then see a new Group header. If you now look at your Matinee Action in Kismet, you can see it has created a new variable connector with the name of your Group, and a new Object variable containing a reference to the Actor you wanted that Group to work on. It is possible to connect multiple Actors to the same Group connector, which is very useful if you want to control the brightness of a number of lights in the same way over time for example.
The little colored bar in the Group header is the editor `Group color'. This is used for various things in Matinee to help you identify which objects in the scene are controlled by which Group in Matinee. It can be changed by selecting the Group and adjusting the GroupColor properties at the bottom of the window. Right clicking on the Group title allows you to Rename or Delete the entire Group. Once you have a Group selected, pressing the Up and Down arrow keys allows you to move it around in the list, which can be useful for keeping similar Groups together.
Note that whenever you select a Group (or Track in a Group) the Actor in the level will be selected for you, and vice versa.
Creating A New Track
A Group on its own does nothing to the Actor it is working on. To actually modify it in some way, we must add a Track to that Group. Right-click on the Group header and it will bring up the New Track menu. This lists all the different classes of Matinee Track that can be added. Select the class you want and it will appear within that Group. Depending on the Track class, you may be prompted for more information before it is added.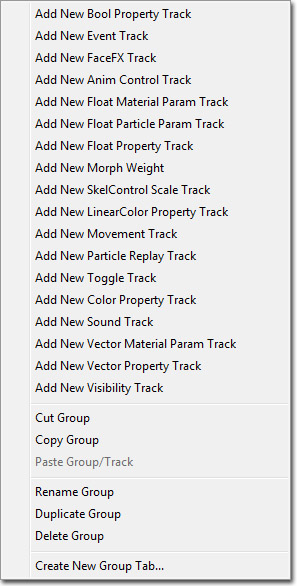 Some Track classes (such as the Movement Track) only allow you to have one per Group, whereas others allow you to have multiple in the same Group (such as Float Property Tracks).
If you want to hide all the Tracks in a Group you can press the arrow on the Group header to `fold' it up. You can change the order of Tracks within a Group in the same way as you move Groups - just select it and use the Up and Down arrow keys.
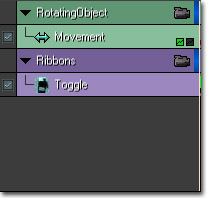
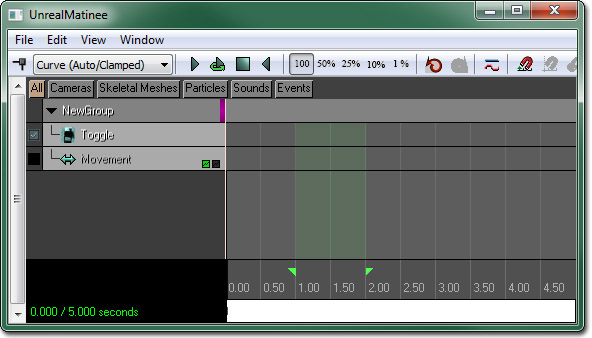
The affect of tracks can be toggled on and off by using the checkmark box next to the name of the track. For example, in the following image, the movement track is disabled and the effects of the track will not be seen when the matinee sequence is run.
Some Track classes (such as the Movement Track) only allow you to have one per Group, whereas others allow you to have multiple in the same Group (such as Float Property Tracks).
If you want to hide all the Tracks in a Group you can press the arrow on the Group header to `fold' it up. You can change the order of Tracks within a Group in the same way as you move Groups - just select it and use the Up and Down arrow keys.
The affect of tracks can be toggled on and off by using the checkmark box next to the name of the track. For example, in the following image, the movement track is disabled and the effects of the track will not be seen when the matinee sequence is run.
Keyframes
The selection and manipulation controls for Matinee are similar to tools in other parts of UnrealEngine 3. Clicking on a keyframe will move the playback position to that keyframe and put Matinee into `record' mode. Modifying the property of the Actor controlled by that track will then modify the keyframe value. When editing a keyframe, a little red circle will appear in the Matinee info box: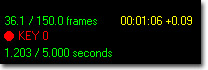 Scrubbing to a different position or beginning playback will take you out of `record' mode and changes to Actors in the scene will not be remembered.
Adjusting Sequence Length
Changing the length of your sequence is very straightforward - simply grab the red handle that marks the end of your sequence (number 22 in diagram) and drag it to the new time you with the sequence to end. It is completely safe to have keyframes outside the range of the sequence. You can also add time at a particular point in the sequence by moving the playback position to the point where you want to insert the time and choosing `Insert Space At Current' from the `Edit' menu.The Loop Section
The green area highlighted in Matinee is the `Loop Section'. This is used for several utilities within Matinee, and can be adjusted by dragging the green handles on the scrub bar that mark the beginning and end of the section. If you press the `Loop preview playback' button (number 3 in diagram), the playback position will jump to the beginning of the loop section, play through it and then jump back to the start again. This allows you to view a small section of the sequence repeatedly to ensure its doing exactly what you want. You can also `stretch' the current loop section to a new length. To do this, set the loop section over the area you wish to stretch and choose `Stretch Section' from the `Edit' menu. A text-entry dialog will show you the current length of the section, and allow you to enter the new length you desire. Keyframes will be re-spaced over the new length of the section. You can also delete the loop section altogether by selecting `Delete Section' from the Edit menu.Sharing Matinee Data
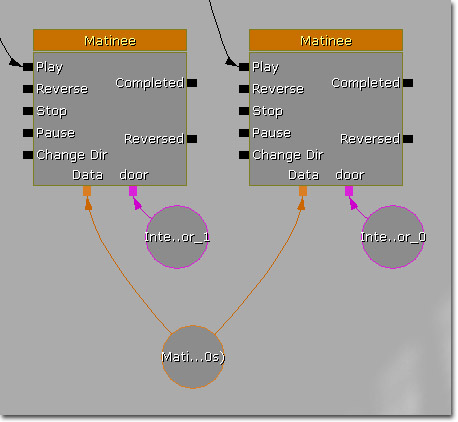 When you connect a Matinee Data variable to a Matinee Action, all the Object Variable and event output connectors will appear. You also connect Matinee Data through Named or External variables (see Kismet User Guide for more info).
When using Movement tracks in data shared between multiple Actions, you will almost certainly want to use the `Relative To Initial' frame.
When you connect a Matinee Data variable to a Matinee Action, all the Object Variable and event output connectors will appear. You also connect Matinee Data through Named or External variables (see Kismet User Guide for more info).
When using Movement tracks in data shared between multiple Actions, you will almost certainly want to use the `Relative To Initial' frame.
Locking The View To A Group
 button on the Group title bar, it locks any perspective viewports to be at the position of the Actor controlled by that group. As you scrub through the sequence, the camera will move with that object. Also, when you move the editor camera, it will move the Actor around to follow it. This can be useful when adjusting a keyframe for an object to look in a particular direction.
When you lock the camera to the Director Group, it will view through the currently `active' camera. This allows you preview what the scene will actually look like in-game. Whenever you open a Matinee sequence which contains a Director group, it will automatically turn on `realtime' mode on any perspective viewports, and lock the camera to the Director Group.
button on the Group title bar, it locks any perspective viewports to be at the position of the Actor controlled by that group. As you scrub through the sequence, the camera will move with that object. Also, when you move the editor camera, it will move the Actor around to follow it. This can be useful when adjusting a keyframe for an object to look in a particular direction.
When you lock the camera to the Director Group, it will view through the currently `active' camera. This allows you preview what the scene will actually look like in-game. Whenever you open a Matinee sequence which contains a Director group, it will automatically turn on `realtime' mode on any perspective viewports, and lock the camera to the Director Group.
Camera Actors
 Here is a CameraActor in a level:
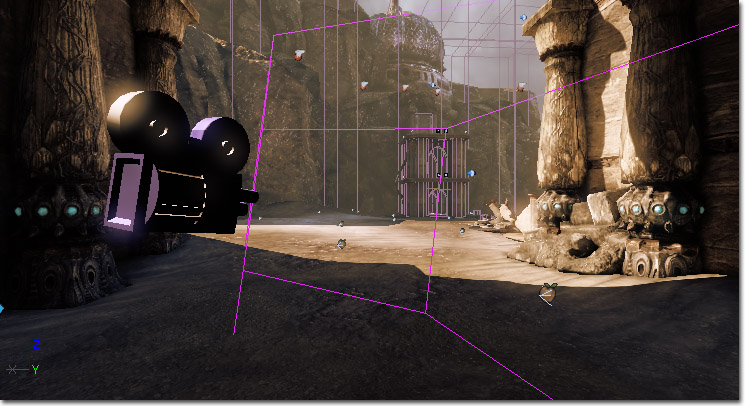 The camera mesh and view frustum will only appear in the Editor, not in the game. As you scrub around in Matinee, the active Camera frustum will highlight yellow. Each camera frustum is otherwise drawn using the Group editor color, making it easy to tell which Group is controlling which camera.
When viewing through a CameraActor with Constrain Aspect Ratio set to true, black bars will be added to the viewport to enforce the screen shape. In the editor, these will only be added when the view is currently locked to a CameraActor.
The camera mesh and view frustum will only appear in the Editor, not in the game. As you scrub around in Matinee, the active Camera frustum will highlight yellow. Each camera frustum is otherwise drawn using the Group editor color, making it easy to tell which Group is controlling which camera.
When viewing through a CameraActor with Constrain Aspect Ratio set to true, black bars will be added to the viewport to enforce the screen shape. In the editor, these will only be added when the view is currently locked to a CameraActor.
Matinee Replication
Cinematics
Exporting and Importing Matinee Data
- Cameras bound to the Matinee sequence
- Actors bound to the Matinee sequence
- Animation Curves for certain tracks
- Movement tracks
- Float Property tracks
- All Lights in current Level
- All Static Meshes in current Level (including polygons, brush geometry and materials)
- All Emitters in current Level (placement cue only)
- It is now recommended to use FBX.
- Current builds of UE3 have only been tested with ColladaMAX 3.05B and ColladaMaya 3.05B.
Key Reduction
 The tool has a few properties:
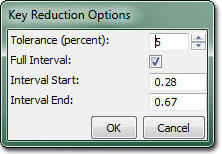
- Tolerance - Sets how far off the straight line between the previous and next keys a key can be to be removed.
- Full interval - If true, the full interval of the track's keys will be used for reducing keys.
- Interval Start - Sets the time to start reducing keys from.
- Interval End - Sets the time to stop reducing keys at.
Gamecaster Integration
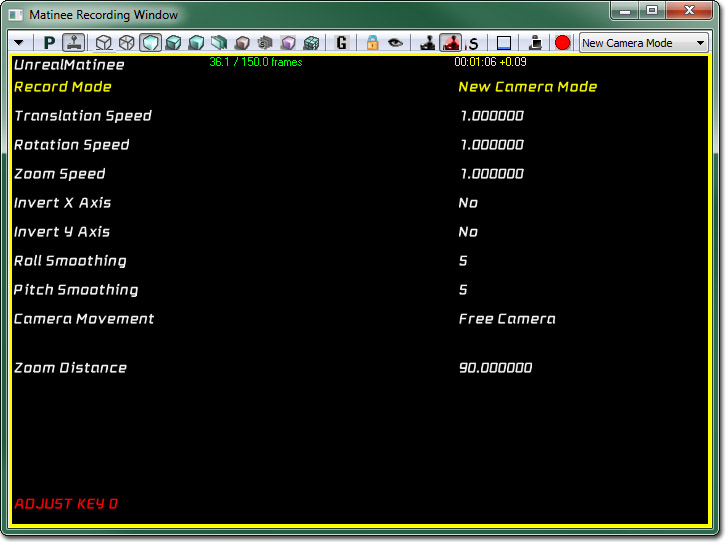 Unreal supports the Gamecaster virtual camera peripheral which offers cinematic creators the power to quickly record camera tracks. The recording window is currently accessed at the far right side of the Matinee toolbar and has the helptext "Launch Recording Window for Matinee".
The basic control scheme is as follows:
Unreal supports the Gamecaster virtual camera peripheral which offers cinematic creators the power to quickly record camera tracks. The recording window is currently accessed at the far right side of the Matinee toolbar and has the helptext "Launch Recording Window for Matinee".
The basic control scheme is as follows:
- Panning movement - Left analog Stick
- Camera zoom - Right analog Stick
- "Record"/"Stop Recording" - Left side button
- Change selected menu option - Left wheel
- Change selected menu value - Right wheel
- Reset menu value - Press right wheel
- Toggle menu display - Press left wheel
- Playback previously recording cinematic - Press right analog stick
- New Camera Mode - Every Recording will create a new camera actor, select it, and create a movement and FOV track to record into
- New Attached Camera Track - Every Recording will create a new camera, select it, create the appropriate tracks, and attach to the selected object. Great for attaching to actors or other cameras to create complex dollies.
- Duplicate selected tracks - This will duplicate the selected tracks, select them and record into them. This is great for doing multiple "takes" for one camera to review later.
- Replace selected tracks - Used to overwrite an existing track. Use this to quickly erase and re-record a track that didn't turn out well.
- Free Camera - The left analog stick will pan in the plane of the camera (i.e. Forward on the stick will move the camera into the screen)
- Planar Camera - The left analog stick will pan in the xy-plane only.
- After recording, it is recommended to try to Reduce Keys on the selected tracks.
- To maximize frame-rate, it is recommended that all standard editor viewports be taken out of "real-time" mode during recording.
- This recording system is also compatible with a console controller and supports inverting the x and y axes.
